Tuesday, November 18, 2014

The Guilt of Good Health

Have you ever done something that made you feel guilty? Cheated on a test? Picked on someone? 
You know that guilt that eventually builds up inside you?  
That's me most days.  

Don't get me wrong.  This post isn't about me wanting people to feel sorry for me.  If anything, I want people to read this and start living life for the big beautiful things it offers and stop sweating the small stuff.  

Here's the bottom line: I feel guilty for being healthy.  

1 in 272,000.  or 0%.  Those are the statistics for Thalassemia.  Thalassemia is a genetic blood disorder which is most prevalent among Mediterranean people.  That is what my sister Heidi has. 

Thalassemia is the big dark cloud that has followed my sister for her entire life.  

Heidi is 3 years older than me.  For my entire childhood and most of my teenage years I always saw my sister as a protector. I never could see her illness as weakness.  It was like her role as big sister blinded me from the reality.  The reality was that she had a rare blood disorder that doctors really couldn't figure out.  I was too young to know that her life was so different than mine even though just a hall way separated us.  

From an early age my parents always encouraged Heidi to look out for me.  I was the younger sister and I'm sure they could tell that I was a highly sensitive child.  And that's exactly what Heidi always did.  She looked out for me.  As latch key kids we relied on one another for a lot.  Mostly, I relied on her.  

I relied on her for her culinary skills (and this is the reason to this day that I really lack in that department).  I'll give y'all a quick story that illustrates her natural culinary skills: I am probably 9 and she's around 12.  We decide to make our parents an anniversary dinner.  This dinner was not your typical dinner.  Our dinner for our parents consisted of homemade pasta.  Yep. She got out the pasta machine.  We made the dough.  We made fresh spaghetti for our parents. Admit it.  You're impressed. :)

Fast forward over 20 years and here we are today.  Heidi is very close to having a feeding tube.  Her god given talent of cooking immaculate meals and probably one of her greatest sources of happiness may be just a memory.  I'm sure she will still cook for Kevin, her husband.  Even so, I'm sure passion for cooking dwindles as the physical ability to enjoy it does.

Heidi had open heart surgery just weeks before beginning James Madison University.  I saw her in ICU with god knows how many tubes in and out of her as she laid.  It's been almost 15 years since that surgery and that image is still so very clear in my mind.  She triumphed on as I thought she would with her super older sister power. :)  She had a normal happy college life and then just weeks after graduating college, I held her in my arms after she had her first grand mal seizure.  And then the battle against seizures started.

And then there's me.  Still healthy.  Sure, I've had my ups and downs in life.  But I'm healthy.  It is NOTHING in comparison to what my big sister has endured and is still battling.   

How do I deal with all of this?

Terribly.  I have NO idea how to handle it.  I cry on my car rides home from work.  My parents and my sister and I are now grown adults with our own families but there's still a feeling of deep sadness and imbalance knowing that one of us, one of the four of us, is suffering and seems to be heading down hill.  

I struggle with the thought that this could be me instead of my sister easily.  I was somehow spared.  And I can't come to terms with that.  

So to my friends, I know I'm distant.  I am sorry.  I will try to break down the walls that I have built around me.

To my mom and dad: keep doing what you're doing.  In my heart it will always be the four of us as one strong unit.  A unit that remains strong because of you two.

To my sister: don't give up.  Thalassemia (or whatever is making this happen) has messed with the wrong bitch! hehe. Mom is probably so mad that I cussed in my blog. ;)

To my brother in law, Kevin: you're a stand up guy.  You were meant for Heidi. :)

To Nate: you're my rock. Life is easier with you in it. Keep the hugs coming.

And to my Jayden: keep the silliness coming.  Mommy needs it!

To anyone else reading this: keep living.  You're healthy.  Don't take it for granted.

For me, I think the guilt will always be there.  I'll carry on as I do but I will break down time to time.


Wednesday, November 12, 2014

Our Cabinet Transformation...FINALLY!

First, let me start by saying that there was nothing wrong with the cabinets.  When I was first saw them I had an 'ehhh' reaction (insert Greek/Italian hand gesture and facial expression).

After almost a month of painting the entire interior of the house I was hesitant to start a new project.  My mom tried to talk me out of it. Nate was hesitant.  Hell, I was reluctant. 
But I went for it.
I read a LOT of reviews and how-to blogs about painting cabinets and decided to use Rustoleum Cabinet Transformations Kit. 
The biggest selling point of this kit is that it eliminates the sanding process (don't worry I'll explain how).
The project is a 3 step process (4 steps if you use the optional decorative glaze).

THE SET UP
 Before you begin, take off all of the doors and drawers.  Tape off edges on the walls to avoid getting product on the walls.

Initially, I set up the cabinets standing up like this:

I found that this position was difficult to paint on.  It causes drips in the paint and if you are leaning the cabinet against plastic it will most likely stick to the plastic a little.

Instead I repositioned the cabinets like this:

STEP 1 - Cleaning and deglossing 
Clean the cabinets thoroughly.  I used warm water and Pine-sol. This process takes time.  For 21 cabinets and 6 drawers, cleaning took about 2.5 hours.  Be sure to clean off grease that may be on kitchen cabinets.  


Next is the deglossing process. This is the part that replaces the traditional step of sanding. The kit comes with scrub pads and liquid deglossing formula. Scrub the liquid onto the cabinets.  This preps the cabinets so the paint will adhere properly.  

Scrubbing action:

After scrubbing you will need to wipe down any excess liquid deglosser.  You will be surprised to see how much liquid remains on the cabinets. Here is what I wiped away on one cabinet:

TOTAL TIME FOR STEP 1: ABOUT 4.5 HOURS

STEP 2 - BOND COAT
The bond coat is the color stain.  We chose the color Kona.  It's the darkest brown you can get.  
This step is time consuming because it requires 2 coats.  
You start by painting the frames first then move on to the cabinets and drawers.  
I would describe the paint as thicker than stain but thinner than standard wall paint.  

I didn't tape the hinges of the cabinets because mine aren't completely flush to the wood so I could maneuver the brush under it carefully like this:

TOTAL TIME FOR STEP 2: ABOUT 9.5 HOURS

STEP 3 - PROTECTIVE TOP COAT
This step scared me.
There were so many reviews that said that the top coat product was crap.
 Many of them opted to buy standard polyurethane.

I started at a spot that wasn't in a high traffic area...just in case I wasn't pleased with the results. 
The consistency is much thinner than standard lacquer.  It is a milky white color which was the main complaint of other reviewers.  Once you start painting it and do back and forth brush strokes, the white color clears up and evenly coats the area. 

Here is my one complaint about the kit and this particular step: they say to start with the back of the of the cabinets.  I do NOT recommend that.  Being that the protective coat is rather thin, it's really hard to prevent dripping. 

So let me walk you through the final hours of this project....
I'm exhausted, physically and mentally.
It's like I'm on the final mile of a race and I can see the finish line.  
I am about to paint the front and final side of the cabinets and drawers.
I give a little speech to Nate and my Mom and went a little something like this..."after hours and hours of hard grunt work, I am about to put the final coat on these cabinets...I'm am so excited".
I walk outside, flip over the cabinets and discover this:

 Excess protective coat from the back of the cabinet door that dripped to the front and dried up.  
ahhhhhhhh!!!! 

I had to use a sanding block to sand off the damage, then repaint those areas TWICE and then finally do the last damn coat.  

TOTAL TIME FOR STEP 3: ABOUT 6 HOURS.

Would I recommend this kit to others? ABSOLUTELY!

A couple tips:
  • Set up the doors and drawers on tables. Otherwise you will spend hours squatting awkwardly like I did (hellooooo BenGay).
  • Make sure you have good lighting.  Our garage is poorly lit so I had to touch up several spots that needed more paint.  
  • Be realistic.  This is a DIY project. It will take time, patience, and dedication.


TOTAL TIME FOR THIS PROJECT: 20 HOURS.

Was it worth it?


I think so. ;)


Tuesday, January 22, 2013

Pinterest Pins Put into Action!

Pinterest, where have you been my whole life? 

What was life before pinterest?  I'll tell you.  Mine was unorganized chaos.  Now it's organized chaos.  Now I have a place to organize my prospective craft projects, design my dream home, drool over dessert recipes that I hope to make, and find pretty jewelry and outfits that I want.

I must confess that I found it difficult to control my pinning of craft ideas.  It was craft overload! 

I made a goal to only pin craft and DIY ideas that I would realistically make so I thought I would share some of my pins that I put into action. =]


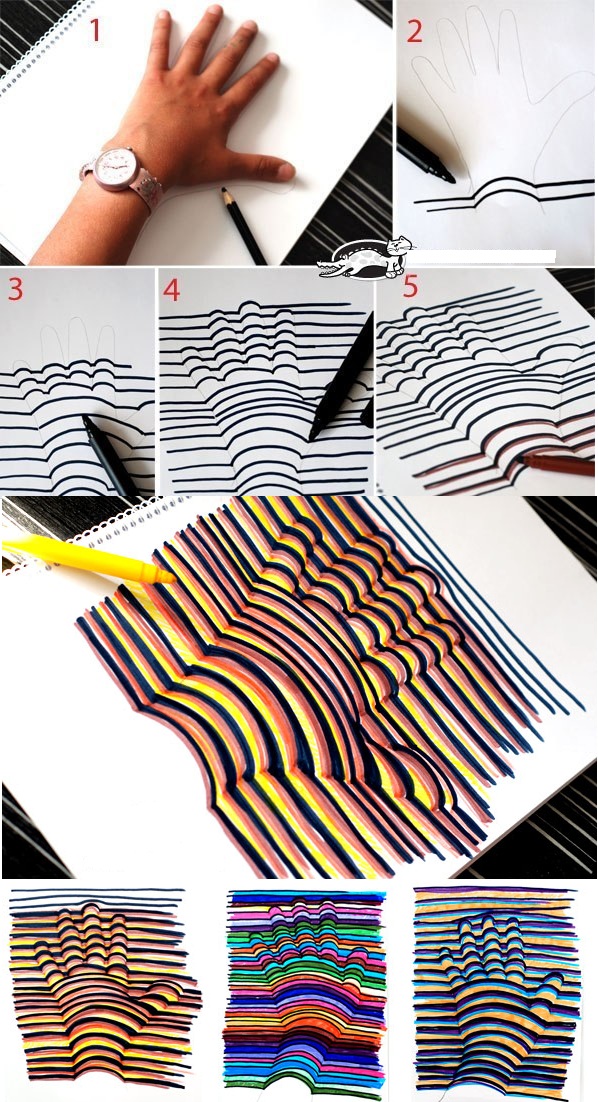
Here is a cool 3D hand outline I created....

and here is the pin:


Source: choualbox.com via Dana on Pinterest


Here is a cool soap pump idea:

and here is the pin:


Here is a small stand for the kitchen sink:
The soap pump is a store bought hand soap.
I took off the label and added a letter J sticker and some decorative string.
(this requires Goo Gone)


and here is the pin:

Source: natalme.com via Dana on Pinterest

Here is a decorative tray:

and here is the pin:


Here's a cute day by day dry-erase board:

and here's the pin:


Here are boot inserts made from a pool noodle:

here is the pin:


Now get on Pinterest and PIN PIN PIN!

Tuesday, January 15, 2013

A fun and SIMPLE non-traditional wreath

I have been in search of wreath ideas on Pinterest for a while now with no luck.

 Sure, there are plenty but none are my style.

I wanted something very simple with neutral colors. I also didn't want anything too large. Small and simple but with a personal twist (which I'm sure my husband greatly appreciates).

I browsed through my craft supply assortment and came across thick twine and a plain square unfinished frame. Then I bought a letter J from Walmart.


I wrapped the twine around the frame.

Then I added the letter J (which I lightly spray painted white).  I also added flowers that I purchased from Michaels.   I used the adhesive below to glue the letter J and the flowers. 


And here is the finished product!


It's small and simple and does not cover the ever-so-important peep hole. =]


Thursday, December 13, 2012

BENGAY Zero Degrees Product Review

My First Product Review: BENGAY Zero Degrees

I would like to thank BENGAY for sending me their product to review.  I appreciate the opportunity. =]

I thought the best way to review this product was to use it after an activity I know would make me sore and achy...MOVING! 

My husband and I moved over the course of 2 weekends and it was very last minute so we couldn't arrange for any help.
That meant that him and I had to do the moving ourselves.
So you better believe I was sore!


Here is a picture of the product. 

It comes in a plastic resealable bag.
 As you can see it looks like a stick of deodorant. 


It says that the product may be stored in
the freezer so that's what I did.

I have used pain relieving products for years so for me evaluation is based on smell, ease of application, greasiness (and will it stain clothing), and of course pain relief.


Smell:  it does have the typical BENGAY smell but it isn't as strong.  The smell fades over time.
Overall the smell would not deter me from buying the product. 

Ease of application:  this product is very easy to apply.  I applied it to my hips and to the back of my neck and I had no problem covering the area well.  BONUS: no more messy hands!

Greasiness (and will it stain clothing):  No and no.  I checked all articles of clothing and absolutely no stains! Impressive!

Pain relief: Yes! Fantastic pain relief!  I will warn you that the initial shock of the ice cold gel (since it came straight from the freezer) will make you jump but it's worth it.  It's instant relief and last for hours. 

Would I recommend this product?
YES!

It's now available in stores nationwide. 

Visit www.bengay.com for more information.


Monday, October 1, 2012

Do my high triglycerides make my butt look big?


mmmmmm YUMMY

Before I switched jobs I decided to take a couple days off so I could take care of doctor appointments.  Apparently when you’re over 30 doctors start to get concerned about cholesterol so that was included in my blood work.  I received the call yesterday that my triglycerides were 306!

This chart from the Mayo Clinic shows what you should aim for:

Triglycerides
(U.S. and some other countries)
Triglycerides*
(Canada and most of Europe)

Below 150 mg/dL
Below 1.7 mmol/L
Desirable
150-199 mg/dL
1.7-2.2 mmol/L
Borderline high
200-499 mg/dL
2.3-5.6 mmol/L
High
500 mg/dL and above
Above 5.6 mmol/L and above
Very high


At least I’m not in the very high category, right? J

My first reaction to this was ‘wait maybe I had a burger or steak right before that.’  Nope.  All I had for the 12 hours prior was a grande skinny caramel latte from Starbucks.  Damn. 

I get my blood checked again in 4 months so let’s see if I can bring it down into the healthy range!  My plan is to do diet and exercise.  I would love to take a pill and have it magically go down but the medicines out there have so many potential side effects. Chronic diarrhea and liver problems?! No thank you!

All of this made me realize that certain events and findings remind me that I am, in fact, in my 30’s.  Here’s a little top 5 list:

You know you are in your 30’s when….

5 - Cholesterol checks/screenings become a regular part of your blood work (and you do NOT pass).

4 – You have to explain the meaning behind this to someone in their early 20’s: 
           
3 - You like a shirt so much that you buy it in all colors and patterns available.  What happened to my sense of fashion? Oh yes, I remember.  I traded it for comfort.

2 – The first thing you do when you get home from work is change into pajamas.  I want to LIVE in my pajamas/lounge clothes.  Even jeans are uncomfortable.  Hell, anything WITHOUT an elastic waist is uncomfortable.

And finally…

1 – A staple item in your living and/or bedroom is a heating pad!  I’m just a step away from the retirement home and Costco-sized tubs of ben-gay. 

I didn’t get aches and pains in my 20’s.  I’m achy and sore from working at a desk and starring at a computer screen all day which leads to not wanting to exercise (especially once I’m in comfy clothes – see above) which then leads me to failing a cholesterol screening.  Ahhh this is a vicious cycle!

-Dana

Friday, August 17, 2012

Digital Talk and an Awesome Etsy Shop

There are many sources for digital clip art and paper.  I mentioned in a previous post about downloading free sets from a site.  Those work wonderfully.   However, what if you can’t find something you really want to put on your digital layout??  Where do you turn? 

I turn to Etsy (www.etsy.com).  If you have never been on Etsy the best way I can describe it is it’s a never ending online catalogue for supplies and handcrafted goods.  It’s one website with THOUSANDS of shops.  If you search “digital clip art” or “digital paper” you will find TONS of digitals available to purchase.  You want elephant clip art, they have it.  You want flowers, they have it.  You name it, they got it.  =]

One of my favorite shops is MareeTrueLove (http://www.etsy.com/shop/MareeTruelove). 

Maree's shop sells Digital Clip Art, Digital Frames, and Digital Paper Packs (available in 8x8 and 12x12).

Here are some of the awesome products available:

DIGITAL PAPER PACKS:

DIGITAL CLIP ART:

Here is an example of what you can create with MareeTrueLove digital art....

I purchased this set:

and created this:
This is available at my Etsy shop:
or


I purchased this set:

and created this:
This is customizable and is also available at my Etsy shop:


With products from MareeTrueLove, the possibilities are ENDLESS!
Please stop by her store and use the code BLOG25 and receive 25% off!!