Tuesday, January 22, 2013

Pinterest Pins Put into Action!

Pinterest, where have you been my whole life? 

What was life before pinterest?  I'll tell you.  Mine was unorganized chaos.  Now it's organized chaos.  Now I have a place to organize my prospective craft projects, design my dream home, drool over dessert recipes that I hope to make, and find pretty jewelry and outfits that I want.

I must confess that I found it difficult to control my pinning of craft ideas.  It was craft overload! 

I made a goal to only pin craft and DIY ideas that I would realistically make so I thought I would share some of my pins that I put into action. =]


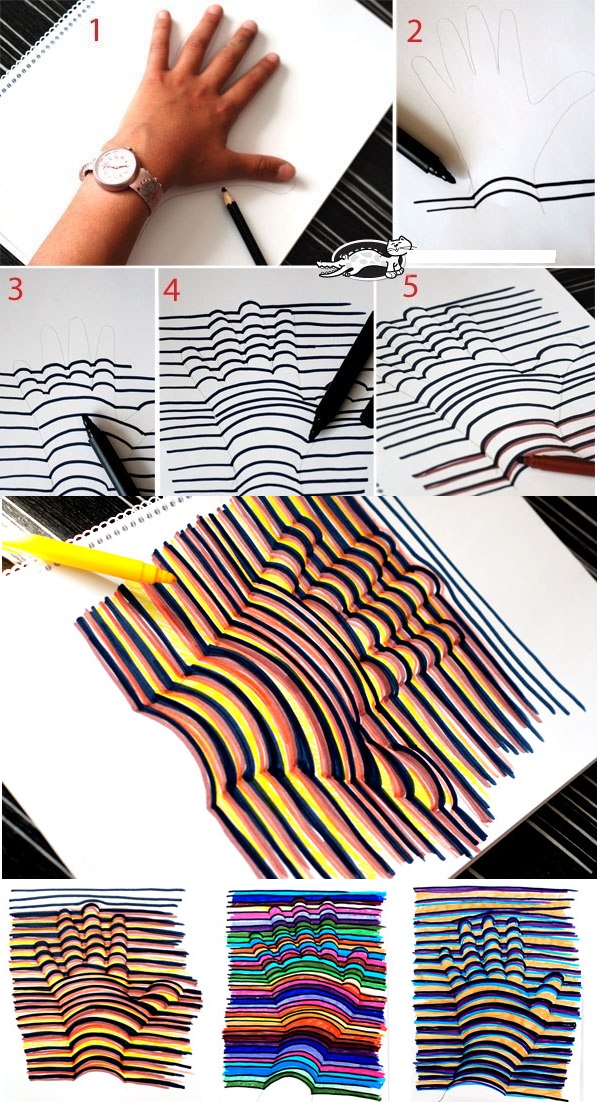
Here is a cool 3D hand outline I created....

and here is the pin:


Source: choualbox.com via Dana on Pinterest


Here is a cool soap pump idea:

and here is the pin:


Here is a small stand for the kitchen sink:
The soap pump is a store bought hand soap.
I took off the label and added a letter J sticker and some decorative string.
(this requires Goo Gone)


and here is the pin:

Source: natalme.com via Dana on Pinterest

Here is a decorative tray:

and here is the pin:


Here's a cute day by day dry-erase board:

and here's the pin:


Here are boot inserts made from a pool noodle:

here is the pin:


Now get on Pinterest and PIN PIN PIN!

Tuesday, January 15, 2013

A fun and SIMPLE non-traditional wreath

I have been in search of wreath ideas on Pinterest for a while now with no luck.

 Sure, there are plenty but none are my style.

I wanted something very simple with neutral colors. I also didn't want anything too large. Small and simple but with a personal twist (which I'm sure my husband greatly appreciates).

I browsed through my craft supply assortment and came across thick twine and a plain square unfinished frame. Then I bought a letter J from Walmart.


I wrapped the twine around the frame.

Then I added the letter J (which I lightly spray painted white).  I also added flowers that I purchased from Michaels.   I used the adhesive below to glue the letter J and the flowers. 


And here is the finished product!


It's small and simple and does not cover the ever-so-important peep hole. =]


Thursday, December 13, 2012

BENGAY Zero Degrees Product Review

My First Product Review: BENGAY Zero Degrees

I would like to thank BENGAY for sending me their product to review.  I appreciate the opportunity. =]

I thought the best way to review this product was to use it after an activity I know would make me sore and achy...MOVING! 

My husband and I moved over the course of 2 weekends and it was very last minute so we couldn't arrange for any help.
That meant that him and I had to do the moving ourselves.
So you better believe I was sore!


Here is a picture of the product. 

It comes in a plastic resealable bag.
 As you can see it looks like a stick of deodorant. 


It says that the product may be stored in
the freezer so that's what I did.

I have used pain relieving products for years so for me evaluation is based on smell, ease of application, greasiness (and will it stain clothing), and of course pain relief.


Smell:  it does have the typical BENGAY smell but it isn't as strong.  The smell fades over time.
Overall the smell would not deter me from buying the product. 

Ease of application:  this product is very easy to apply.  I applied it to my hips and to the back of my neck and I had no problem covering the area well.  BONUS: no more messy hands!

Greasiness (and will it stain clothing):  No and no.  I checked all articles of clothing and absolutely no stains! Impressive!

Pain relief: Yes! Fantastic pain relief!  I will warn you that the initial shock of the ice cold gel (since it came straight from the freezer) will make you jump but it's worth it.  It's instant relief and last for hours. 

Would I recommend this product?
YES!

It's now available in stores nationwide. 

Visit www.bengay.com for more information.


Monday, October 1, 2012

Do my high triglycerides make my butt look big?


mmmmmm YUMMY

Before I switched jobs I decided to take a couple days off so I could take care of doctor appointments.  Apparently when you’re over 30 doctors start to get concerned about cholesterol so that was included in my blood work.  I received the call yesterday that my triglycerides were 306!

This chart from the Mayo Clinic shows what you should aim for:

Triglycerides
(U.S. and some other countries)
Triglycerides*
(Canada and most of Europe)

Below 150 mg/dL
Below 1.7 mmol/L
Desirable
150-199 mg/dL
1.7-2.2 mmol/L
Borderline high
200-499 mg/dL
2.3-5.6 mmol/L
High
500 mg/dL and above
Above 5.6 mmol/L and above
Very high


At least I’m not in the very high category, right? J

My first reaction to this was ‘wait maybe I had a burger or steak right before that.’  Nope.  All I had for the 12 hours prior was a grande skinny caramel latte from Starbucks.  Damn. 

I get my blood checked again in 4 months so let’s see if I can bring it down into the healthy range!  My plan is to do diet and exercise.  I would love to take a pill and have it magically go down but the medicines out there have so many potential side effects. Chronic diarrhea and liver problems?! No thank you!

All of this made me realize that certain events and findings remind me that I am, in fact, in my 30’s.  Here’s a little top 5 list:

You know you are in your 30’s when….

5 - Cholesterol checks/screenings become a regular part of your blood work (and you do NOT pass).

4 – You have to explain the meaning behind this to someone in their early 20’s: 
           
3 - You like a shirt so much that you buy it in all colors and patterns available.  What happened to my sense of fashion? Oh yes, I remember.  I traded it for comfort.

2 – The first thing you do when you get home from work is change into pajamas.  I want to LIVE in my pajamas/lounge clothes.  Even jeans are uncomfortable.  Hell, anything WITHOUT an elastic waist is uncomfortable.

And finally…

1 – A staple item in your living and/or bedroom is a heating pad!  I’m just a step away from the retirement home and Costco-sized tubs of ben-gay. 

I didn’t get aches and pains in my 20’s.  I’m achy and sore from working at a desk and starring at a computer screen all day which leads to not wanting to exercise (especially once I’m in comfy clothes – see above) which then leads me to failing a cholesterol screening.  Ahhh this is a vicious cycle!

-Dana

Friday, August 17, 2012

Digital Talk and an Awesome Etsy Shop

There are many sources for digital clip art and paper.  I mentioned in a previous post about downloading free sets from a site.  Those work wonderfully.   However, what if you can’t find something you really want to put on your digital layout??  Where do you turn? 

I turn to Etsy (www.etsy.com).  If you have never been on Etsy the best way I can describe it is it’s a never ending online catalogue for supplies and handcrafted goods.  It’s one website with THOUSANDS of shops.  If you search “digital clip art” or “digital paper” you will find TONS of digitals available to purchase.  You want elephant clip art, they have it.  You want flowers, they have it.  You name it, they got it.  =]

One of my favorite shops is MareeTrueLove (http://www.etsy.com/shop/MareeTruelove). 

Maree's shop sells Digital Clip Art, Digital Frames, and Digital Paper Packs (available in 8x8 and 12x12).

Here are some of the awesome products available:

DIGITAL PAPER PACKS:

DIGITAL CLIP ART:

Here is an example of what you can create with MareeTrueLove digital art....

I purchased this set:

and created this:
This is available at my Etsy shop:
or


I purchased this set:

and created this:
This is customizable and is also available at my Etsy shop:


With products from MareeTrueLove, the possibilities are ENDLESS!
Please stop by her store and use the code BLOG25 and receive 25% off!!


Tuesday, August 14, 2012

FREE Facebook Banner Templates!!

When Facebook introduced the timeline feature, the first thing I did was search the web to find the dimensions of the banner.  It's 2.84 inches X 1.05 inches.  What?!  Who in the world owns pictures that size?

I made my own design for my facebook banner and then I decided to share the love and make a couple banners available to anyone who wants it. 

Click on the link below the banner you would like then
right click and select 'save picture as'.
Save it wherever is convenient on your computer. 

To put your pictures in the banners, open the jpg
in Photoshop or Microsoft Publisher
(or any photo editing program will work).


Have a great Tuesday!


Friday, August 10, 2012

Digital Scrapbook Page Tutorial

Since I hyped up the world of digital scrapbooking, I thought I would give a tutorial on how to make a page.

For this tutorial, I am using digital files downloaded from http://www.computerscrapbook.com/. 


I chose the "California Cool" set. 


Look what great papers and elements you get with this set!

Now it's time to get Microsoft Publisher open and ready to use...

Select "More Blank Page Sizes"


Select "Create New Page Size"

Create a 12x12 blank document with 0" margins.

To insert your background, go to 'Insert' and select 'Picture'.

I decided to go with the brown with teal dots background.

The paper you selected shows up like this above so you will
need to adjust the size by click and dragging the bottom right corner.

The next thing I do is select my pictures. 
Use the same steps used for inserting the background.

One of my pictures was taken using Instagram so it has a white frame around it.
To make all of the pictures look uniform I will put a white frame around the other 2.

To make a border around the pictures you have to right click on the picture,
then scroll down to 'Format Picture', then select the 'Colors and Lines' tab which is below:
I used 10pt weight for the border which seemed to be about the same size as my instragram border.


So now my pictures all look the same. 
The next step is to decorate.

Using the same steps used to insert the background
and the pictures, I added ribbon.
Circled in this picture is the 'Bring Forward' and 'Send Backward' buttons.
These are important buttons.
Notice that the ribbon towards the bottom is laying on top of the picture.
By selecting 'Send Backward', the ribbon will lay behind the picture.

Next I added the buttons for decoration. 
(Add them the same way as pictures and background)

I decided to add more ribbon. :)

For me, the last step is to add writing. 
I prefer to do it last but you can do it at any point.
I inserted the paper graphic and cropped it down using
the crop tool as shown on the picture.

After cropping the piece of paper, I realized that I needed to
move everything to the left.  Don't waste time moving each piece one by one.
Instead, hold down control and select each of the things that you want to move.
Then select 'Group'.  This allows you to move all of those items at once.


Next, select the 'Insert' tab, then click 'Draw Text Box'

Bear with me on this next picture.
I wanted to point out the green button that allows you to rotate the text box. 
The same button is on pictures as well. 
Click on the green dot and rotate the text
box so it aligns with the piece of paper.

One important part of this: always have your layout wrapping
setting set to 'None'.  If not, you're inviting lots of frustration!


Your last step is to save the document. 
I always save it as a pub document so I can edit,
then I save it as a jpg.

Here is the final page:

I HOPE THIS TUTORIAL WAS HELPFUL. 
PLEASE FEEL FREE TO EMAIL ME AT
DANAJAGGERS@GMAIL.COM IF YOU HAVE ANY QUESTIONS!

Stayed tuned for my post next week featuring one of my favorite Digital Clip Art Etsy Shops!